Hello
again and welcome to the third installment of Luthier's
Corner. This month, I'd like to discuss a topic
that has confounded guitar players for eons: setup
and maintenance. OK, maybe not eons, but still.
The most important thing to remember is that guitars
are affected by temperature and seasonal changes.
Therefore, it's not enough to just
change strings and tune to pitch. It's these shifts
in temperature and climate that cause shifts to occur
on your guitar, such as too much relief in the neck
to backbowing of the neck, depending on hot or cold,
dry or damp air, etc. the first thing you want
to do before starting a setup is check the straightness
of the neck by sighting down the length of the
neck from the headstock to the body, as in photo "A".
|
|
When sighting a neck, make sure to
look at the curve of the fingerboard as it relates to
the straightness of the low "e" string, and
the same with the high "e" string. after sighting
the neck, you want to do what I call the "bounce" test,
which means taking your first finger of your left hand
and fretting the first fret of the low "e" string,
then take the pinky of your right hand and fret the highest
fret on the low "e".Then you simply use your
right hand thumb to "bounce" the string at
the center of those 2 points to see how much relief the
neck has. If it has more than 1 mm, you will need to
tighten the truss rod. If it has no bounce at all, you
will have to loosen the truss rod. More on that in a
bit. OK, the next thing you want to check is your string
action, or the height of the strings off of the frets.
Ideally, you want to use a measuring rule that has 1/16" increments.
I personally prefer a small aluminum rule that I have
used forever. Everyone's action preference is different,
so base yours on feel. Using the rule at the 12th fret,
check to see that the action is consistently the same
height from the bottom of each string to the top of the
12th fret across all 6 strings.
If you notice that the
action is not consistent across all 6 strings, then you
will have to make some adjustments at the bridge. This
is important because you want the string action to match
the fret board radius or curve. More on this in a bit as
well. The next thing you want to do is a visual inspection
of the fret board, to determine if it's got build up and
needs cleaning or not. If the board is dirty, then you
will want to give it a good cleaning and oiling. More on
this in a bit.
OK, so you have your guitar laid out on your workbench,
ideally, and want to know what to do first. Well, let's
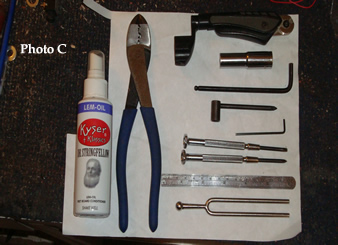
go over a list of tools that you will need. You want to
make sure to have:
- 0000 steel wool, or a synthetic
000 steel wool pad
- A bottle of lemon oil fret board
conditioner, NOT PLEDGE!! There are various brands
on the market, and the Dunlop is the easiest to use
for the novice because it has a cotton wad in the
tip, which makes it easy to apply to the fret board.
- Clean soft cotton cloth to wipe
off the excess lemon oil and buff the board to a
nice shine.
- Another clean cotton cloth to wipe
the guitar when you are finished.
- An Allen wrench, box wrench, or
screwdriver with which to adjust the respective truss
rod that your guitar has.
- A size 1 Phillips screwdriver and
a small flathead screwdriver used for adjusting intonation
of the bridge saddles.
smaller Allen wrenches, depending on metric or standard,
for the height screws of your saddles, if your guitar
is a Fender style.
- 10mm socket for tightening the
ferrules of modern tuning machines.
- Wire cutters for cutting the string
ends.
- A string winder.
- Tuning fork or electronic
tuner.
Please see
Photo "C" for
a better idea. |
|
|
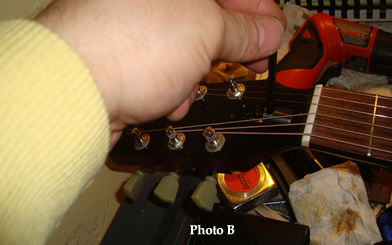
OK, first things
first. You've checked the straightness of the neck
and find that it has a little too much forward bow.
OK, remove the truss rod cover, if it's at the head
stock, using the small phillips screwdriver. then,
using the appropriate wrench that fits the nut of
your truss rod, you want to tighten the rod an 1/8th
of a turn at a time.
Please see photo "B". If
you are looking at the guitar from the head stock
down to the body, then to tighten you would turn
it to the right. Obviously if the neck has a backbow
or is too straight with no relief, then you would
do the opposite to adjust that. Remember the old
adage-righty tightly, lefty loosey. it's better to
use small incremental turns than it is to over tighten
and possibly damage the rod, causing an expensive
repair bill later.
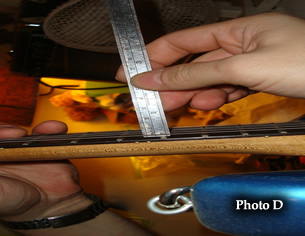
Ok so once you have the truss
rod adjusted to just the right tension, it's time
to move on to the action. Take your small ruler and
measure the distance from the top of the 12th fret
to the bottom of each string to see that the action
is where you want it. Ideally, low action is 1/16".
This is subjective to personal taste. Please
see Photo "D". |
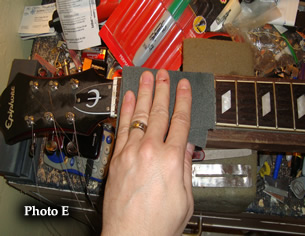
At this point is when you
determine if you remove all the strings to clean to board
or not. If the board is dirty, remove all the strings,
first loosening them, and then cutting and removing them.
Then you take your steel wool and polish the fret board,
in the same direction as the length of the frets, all the
way from the nut to the last fret until most of the grime
is gone. Please see Photo “E”.
WARNING: This can only be done to an unfinished fret board
such as rosewood or ebony. If your guitar has a finished
maple fret board, DO NOT steel wool it. OK, after cleaning
off the grime, it’s time to polish the board with
the lemon oil. Don’t overdue it. If the kind you
have is a pump spray bottle, spray some into the center
of a clean rag and polish the board the same way you did
with the steel wool. If you have the Dunlop, you can simply
apply the wad end of the tip directly to the board and
wipe on the oil, then using the wiping cloth to polish
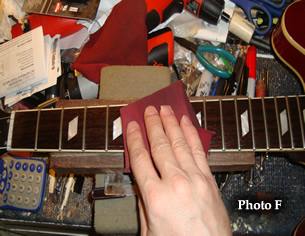
the board. Then wipe off the excess with the dry cloth.
Now would be a good time to use that same cloth to wipe
off the rest of the guitar and give it a bit of a shine
as well. Please see Photo “F”.
OK time to put strings
on. If your board is not dirty and therefore not in need
of steel wool and polish, then remove the old strings one
at a time, replacing each first before moving on to the
next. Obviously if you just cleaned the board, then you
need to install all 6 new strings. Ideally, you want to
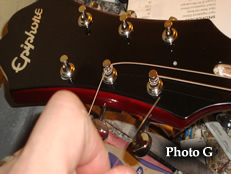
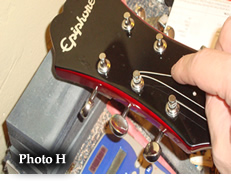
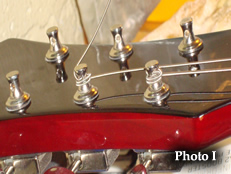
start with the low “E” string
and move down the line accordingly. First, make sure to
turn each tuner so that the hole is parallel with the nut.
The next thing you do is pull the string through the bridge
until it sits taught in the hole or slot, depending on
the type of bridge your guitar has. Pull it to the tuner
and wrap the string 2 full wraps around the post from the
inside to the outside and then, with the string end now
facing inward, pull it through the hole, making sure that
the wraps are underneath, from inside to the outside edge
of the fret board and then give the string end a sharp
bend in the opposite direction of the wind, sort of like
an “S” shape.
Now tune it up. Do that for each string. Please see
Photos “G” through “I” for
more on this. After you tune the string to pitch, it is
important to stretch the string in properly so it will
hold its tuning reliably. The best way to do this is to
grab the string, in front of the end of the fret board,
with one finger and pull it up about an inch or so, giving
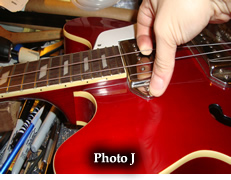
a little “bounce” as you tug. Don’t pull
hard enough to strain, just enough to stretch. The string
will go flat and need to be returned. Keep doing this until
it doesn’t go flat anymore. Please see Photo “J”.
Naturally locking tuners are a different story and don’t
require wrapping the string around the post. Then cut off
the string end just past the bend you gave it. With locking
tuners, you want the hole to actually be in line with the
length of the neck and pull the string straight through
the hole, then lock the string in, either by tightening
the thumb wheel, or tuning the string to pitch while holding
the string end taught, depending on the make of tuner on
your guitar. I’ll cover that in a later issue.
OK, the guitar has new strings, tuned
to pitch, the board is polished, the action is where
you want it, and the neck has the right amount of relief.
Just one more thing to do. You need to check the intonation
and adjust it accordingly if it’s out. Now, there
are different methods that can be used, and while the
method I personally use is the most effective, it is
the most involved. So I will briefly explain the simplest
way to set your intonation that has the least amount
of difficulty for the average player. This is where your
digital tuner comes into play. Plug the guitar into the
tuner and make sure that the guitar is at A “440” (standard)
tuning. OK, now, starting with the low “e” string,
play the 12th fret harmonic and see how it registers
on the tuner. Then fret the 12th fret note and see how
it registers on the tuner. The harmonic is the true note
that the fretted note needs to duplicate.
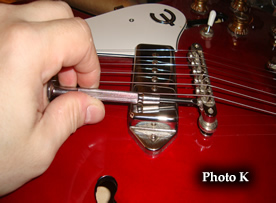
So if the
12th fret note is sharp compared to the harmonic,
then you need to adjust that strings bridge saddle
back or farther away from the neck until it flattens
and matches the harmonic. Naturally moving the
saddle back will mean that the string will go sharp,
so you have to retune the string to the correct
open string pitch. Likewise, if the fretted note
is flat compared to the harmonic, you need to move
the saddle closer the neck until the 2 pitches match.
Please see Photo “K”. And again, moving
the saddle forward will make the string go flat,
so it will need to be retuned to the correct pitch
before checking the intonation again.
Do this correctly
for each string, and you should find your guitar
to play more true, and chords should ring more with
better clarity, not mention making it much more enjoyable
to play.
|
|
OK looks like you are on your way to making your guitar
play like a champ! Tune in next month when I will cover
a few other aspects of the setup process in more detail,
such as the differences in Gibson-style, Fender-style,
and locking tremolo bridges, ideal pickup height settings
for optimal tonal output and volume consistency, and more.
Once again, thanks for reading my column and remember no
task worth accomplishing is ever achieved if not pursued
with fierce dedication. Believe in yourself, and make happen
that glorious noise called music! Until next time remember,
there is nothing you can't do if you set your mind to it!
Cheers!!
|